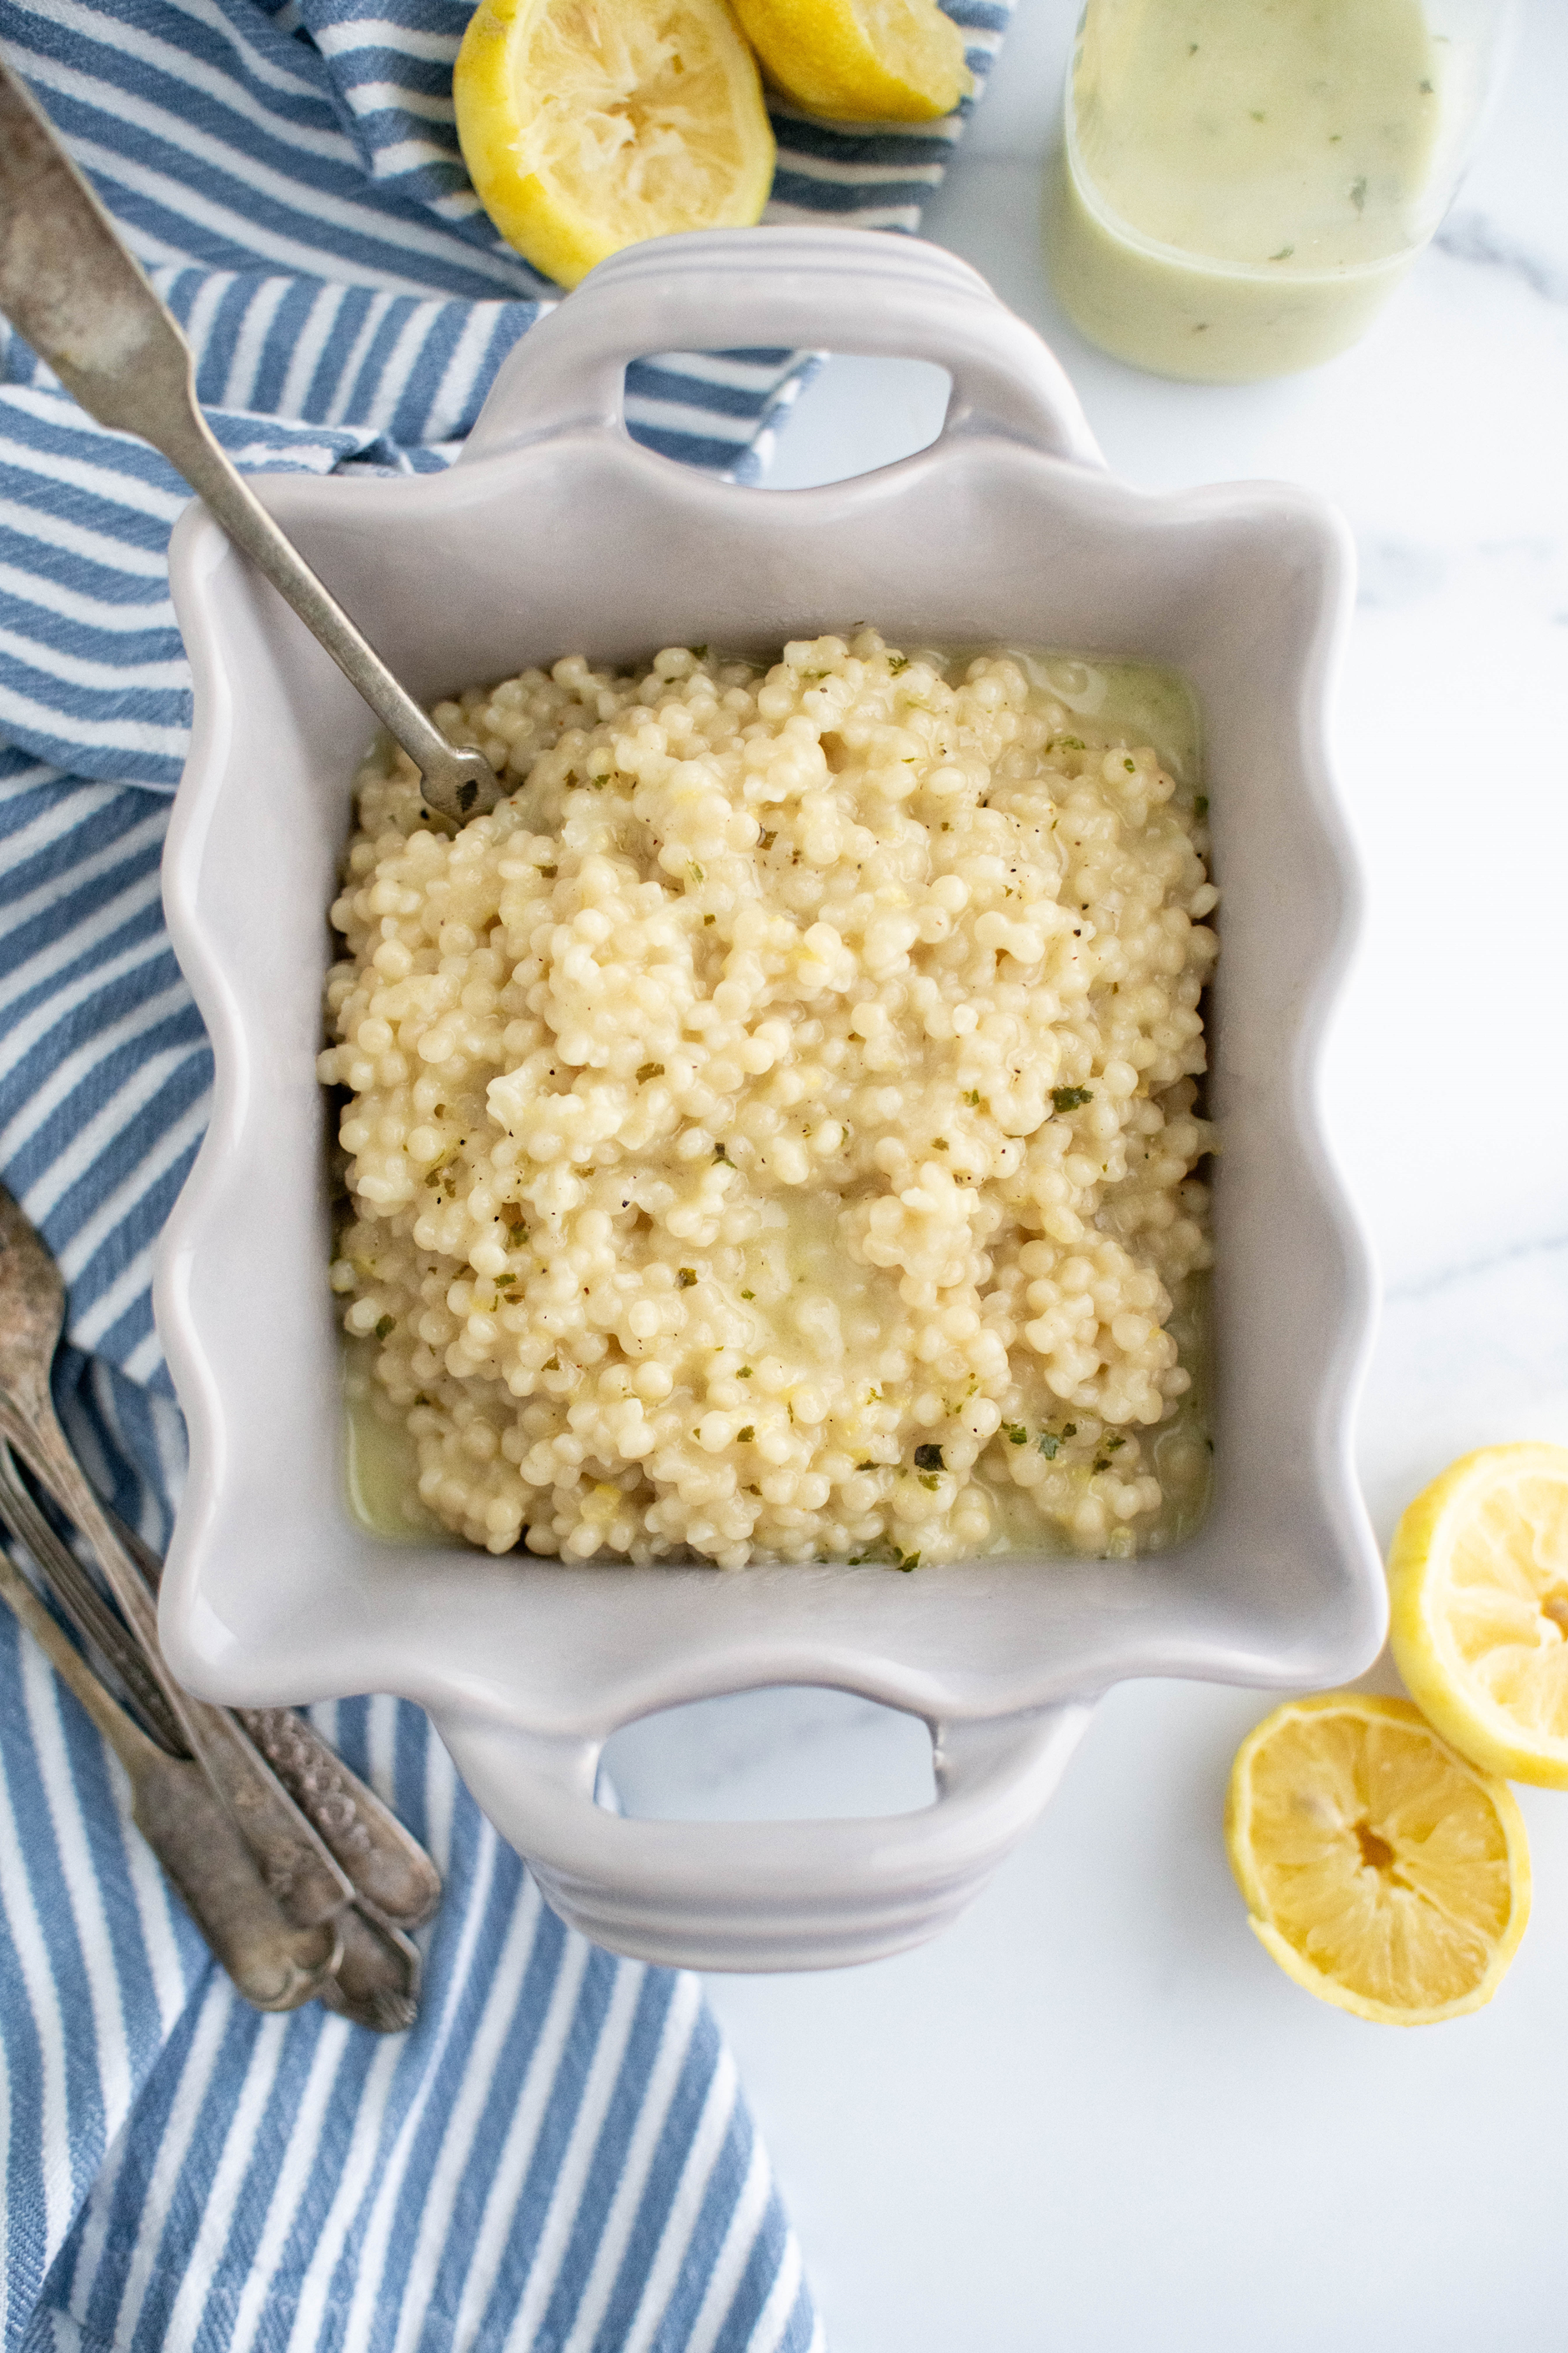
Chocolate Chip Cookie Granola Squares

15 May

Chocolate Chip Cookie Granola Bars 4
We are heading to Fargo on Friday to visit our old stomping grounds and I’m really excited! It’s been 5 months since we moved and although I’m finally starting to feel at home here, I still really miss our first home. And I’m totally ready to eat some delicious food including pizza, burgers and doughnuts….I should make sure to pack some maternity pants so I have some extra room.
Chocolate Chip Cookie Granola Bars 2
But first on the list is driving by our old house. Our first home together, the home we brought Noah home to after he was born, the home where I instilled a love of cooking in Noah. And one of Noah’s favorite things to make and eat is granola bars. I can’t believe that I haven’t shared any with you all here.

We were taking a trip to Kansas to visit Joel’s family so I wanted to bring a treat that was dairy free for my mother-in-law and something that Noah would enjoy too. These granola squares fit the bill perfectly. They tasted cookie-like but included healthier ingredients that make it a little easier to indulge your sweet tooth.
Chocolate Chip Cookie Granola Bars 1
Chocolate Chip Cookie Granola Squares
recipe slightly adapted from Sally’s Baking Addiction

3/4 cup Trader Joes Cookie Butter or Biscoff Spread (or nut butter of  your choice)
2 Tbs.p coconut oil
1/3 cup honey or maple syrup
1 egg
1 tsp. vanilla extract
3 1/2 cups old-fashioned rolled oats
1/4 cup packed light brown sugar
3/4 tsp. salt
2 Tbsp. chia seeds
1/3 cup dark chocolate chips
sprinkles, optional

1. Preheat oven to 350 degrees F. Spray an 8×8 pan with nonstick spray or line with foil for easy cleanup.

2. Melt the biscoff and coconut oil in the microwave. Stir in the honey/maple syrup, egg and vanilla until combined. Stir in the remaining ingredients.

3. Dump the mixture into the prepared pan and smooth it out. The original recipe states to bake for 21-24 minutes but mine took more like 30 minutes. Bake until no longer gooey and edges turn golden brown.
Chocolate Chip Cookie Granola Bars 3

Spicy Lemon Chicken Wraps

10 May

Spicy Lemon Chicken Wraps 1
This is going to be our official meal of summer. It’s light, healthy, refreshing and doesn’t heat up the house. Even Joel, who doesn’t really like chicken all that much, loves these wraps.

The combination of the warm slightly spicy, citrusy chicken with the cool and creamy guacamole is just perfect. And what makes these even more perfect is that they can be thrown together in less than 20 minutes (not counting the time to marinate). Oh, and it doesn’t dirty up too many dishes either…major bonus for the dishes man around here.
Spicy Lemon Chicken Wraps 3
I served these delicious wraps alongside some grilled zucchini for a super simple, healthy weeknight dinner. And it didn’t receive any complaints from the peanut gallery that it “tasted too healthy.” All around win.

Spicy Lemon Chicken Wraps
recipe slightly adapted from The Londoner

3 chicken breasts, sliced into tenderloins
1 lemon, squeezed
1 tsp. chili flakes
2 tsp. paprika
6 Tbsp. hot sauce
2 Tbsp. honey
5 Tbsp. olive oil
1 big pinch of salt

3 ripe avocados
1 clove of roasted garlic, squeezed
1 big pinch of kosher salt
1 squeeze of lemon

sour cream, optional
tortilla wraps (I used whole grain, low carb)

1. Combine the lemon juice, chili flakes, paprika, hot sauce, honey, olive oil and salt in a bowl. Place chicken in a ziplock bag and pour marinade over it. Seal and marinate in fridge for a few hours.

2. Meanwhile, mash the avocados, garlic, salt and lemon juice together. Let sit on the counter for an hour to let flavors mingle or refrigerate if you aren’t eating within that time.

3. Grill chicken until no longer pink and juices run clear. Spread guacamole and a bit of sour cream onto a tortilla. Place chicken on top, wrap up and enjoy.

Loaded Baked Potato Salad

8 May

Loaded Baked Potato Salad 3
I am a huge fan of baked potatoes but now that spring has finally arrived (or so it seems) they just aren’t something I cook. I hate heating up the oven and the house once the warm weather hits and I avoid it at all cost. So what do I do when the craving strikes? Make up this loaded baked potato salad! It provides all the delicious taste of a loaded baked potato without having to heat up the oven. Plus, it’s chilled and refreshing which helps beat the heat.
Loaded Baked Potato Salad 4
There really isn’t anything not to like about this potato salad. Cheese, bacon and ranch are always a winning combination! This would be a great side dish to bring to a summer bbq or just to whip up on a weeknight with a yummy grilled steak.

Loaded Baked Potato Salad
recipe slightly adapted from Key Ingredient

4 large russet or Yukon gold potatoes
1/4 cup light mayo
1/2 cup light sour cream
1/2 cup shredded sharp cheddar cheese
1 Tbsp. dry ranch seasoning
8 strips bacon, cooked and crumbled
1 tsp. black pepper
salt to taste

1. In a small bowl, mix together the mayo and sour cream. After thoroughly combined, stir in cheese, ranch seasoning, salt and pepper.

2. Chop potatoes into bite size chunks (you can peel them if you want, I was lazy and didn’t). Boil potatoes for 10-20 minutes, until tender but not falling apart. Drain potatoes and allow to cool a bit.

3. Mix potatoes and 3/4 of the bacon into sour cream mixture. Top with remaining bacon and chill until ready to serve.
Loaded Baked Potato Salad 2

Flour Tortillas

3 May

Flour Tortillas 3

I have a lot of things on my to-do list and these have been on it forever. You know what’s not on my list? Trying to get my darn, evil cat who has escaped outside and positioned herself under the windowsill with only about a 4 inch clearance between the house and the landscaping with rocks twice in a day. But alas, that’s what I found myself doing. She has never been an outdoor cat but still tries to take every advantage to slip by me when going out the back patio door. I think I made it worse by having the windows open all day…must have made her yearnings that much stronger. I’m starting to get a little bump so I didn’t feel comfortable laying on my stomach in an attempt to grab her so it took patience to get her out of there. And then once she was out, she was off. I’m sure the neighbors were quite amused by the bobbing and weaving moves I used to catch the brat. Twice. Just making sure you remembered.

These were a lot more fun to mark off the to-do list and didn’t result in embarrassment. But I kind of do regret finally making them homemade because now I will never want to buy them again.
Flour Tortillas 2
They are so soft and chewy and amazing. They make the store-bought version taste like cardboard. They will be happening again very, very soon. Make a double batch and freeze the leftovers so you can have them anytime the mood strikes.

Flour Tortillas
recipe from Confections of a Foodie Bride

3 cups all-purpose flour
2 tsp, baking powder
1 heaping tsp. salt
5 Tbsp. shortening, lard, softened butter, or olive oil*
3/4 cup warm water

1. Dump the flour, baking powder and salt into the bowl of a food processor which has been fitted with a dough blade. Add in whichever fat you have chosen to use and pulse until the mixture resembles course sand.

2. Turn on the food processor and slowly pour in the water until the dough forms a ball and moves around the bowl (you may need more or less water).

3. Leave the food processor running for 30 seconds to knead the dough. When the dough is ready, it should soft, not too sticky and clean the bowl. If you do not have a food processor, all of this can be done by hand.

4. Flour a flat surface and divide the dough evenly into 12 balls, about 2 ounces each if you have a kitchen scale. Cover with a towel and leave to rest for 10 minutes.

5. Over medium-high heat, warm a skillet (needs to be dry – no spray, olive oil, butter).

6. Dust a bit of flour over each dough ball then roll thinly into circles. Individually, place each tortilla into the hot pan and flip once they have bubbled and browned a bit, about 20 seconds per side.

7. Place on a clean plate and cover with a kitchen towel to keep them warm. Serve immediately. Eat within 3 days or freeze for future use.

*I used butter.

Pork Carnitas

1 May

Pork Carnitas 2
My parents came for dinner last week so I decided to make one of our favorite kinds of food, Mexican. And it’s just in time to share with you all for Cinco de Mayo. I decided on these amazing pork carnitas, Mexican rice, crock pot refried beans and homemade flour tortillas (which I will be sharing with you later this week).

These carnitas may just blow your mind. For real. I’m still dreaming about that delicious taco.
Pork Carnitas 1

Neither Joel or my brother really like pork so I was a little worried about how this would go over. The verdict…they loved it and have requested it to be made again, soon.

Although the carnitas take a little time to cook and have a few different steps, they come together very easily. And make sure not to skip anything, especially the broiling. It gives the pork a crispy, crunchy bite that is so delicious with the soft tortillas. Man, I need to stop talking about them or else I’m going to start drooling. Please run to the store for the ingredients right now and make this for your family and friends. It’s a great, easy and casual way to entertain any time of the year.

Pork Carnitas
recipe from My Kitchen Escapades

4 pound boneless pork butt, fat trimmed and cut into 2 inch cubes
1 1/2 tsp. salt
3/4 tsp. pepper
1 tsp. ground cumin
1 onion, peeled and halved
2 bay leaves
1 tsp. dried oregano
2 Tbsp. fresh lime juice
2 cup water
1 medium orange, juiced and keep the spent halves

1.  Preheat oven to 300 degrees and move oven rack to the bottom of the oven. In a large dutch oven, combine all the ingredients (including the orange halves) and heat over medium high heat until it simmers. Cover the pot and transfer to the oven for about 2 hours, or until the meat falls apart when you poke it with a fork.

2.  Remove the pot from the oven and turn on the broiler.  Remove the meat from the pan and place it on a large foil-lined jelly roll pan.  Remove and throw out everything from the pot except for the cooking liquid.  Place the dutch oven over high heat on the stove and boil until thick and syrupy, about 20 minutes.  You should have about 1 cup of liquid remaining when it is finished.

3.  While the liquid is reducing, use two forks to pull each cube of pork into three equal sized pieces.  Once the liquid has become a syrup, gently fold in the pieces of pork into the pot.  Try not to break up the pork any further.  Taste and if needed, add some salt and pepper.

4.  Spread the pork back onto the foil lined pan and evenly spread the meat around so there is a single layer of meat.  Place the jelly roll pan on the lower middle rack of the oven and broil until the top of the meat is well browned and edges are slightly crisp, about 5 to 8 minutes.  Using a wide metal spatula, flip the pieces of meat and broil the other side until well browned and edges are slightly crisp, 5 to 8 minutes.  Serve immediately in a tortilla with all your favorite toppings.

Buttermilk Pancakes

29 Apr

Buttermilk Pancakes 5
I’ve made my fair share of pancakes but these guys are the.best.ever. Seriously, they are even better than Cinnamon Streusel Pancakes. Now you really know that I mean business because there aren’t many things better than streusel in my book.
Buttermilk Pancakes 1
I know buttermilk pancakes may seem humble and even a bit boring to most but sometimes it’s nice to just keep things simple and perfect. Like cheesecake for example, why all the crazy mix-ins? I like mine plain with a little fresh strawberry sauce…no need to be adding peanut butter, chocolate, cookie dough, pretzel madness for me. Sorry for the rant but some things are just better left alone. Anyway, back to the pancakes…
Buttermilk Pancakes 3
I don’t mean to go overboard here but it was like I had entered a dream world as I watched these pancakes puff up to incredible heights while cooking on the griddle. I mean, look at them!

Buttermilk Pancakes 6
I’ve never made or eaten such fluffy pancakes. And I will never, eva make any other version of buttermilk pancakes. Just a bit of butter and a pool of pure maple syrup atop these bad boys. Heaven.

Buttermilk Pancakes
recipe from America’s Test Kitchen

2 cups all-purpose flour
2 Tbsp. sugar
1/2 tsp. salt
1 tsp. baking powder
1/2 tsp. baking soda
2 cups buttermilk
1/4 cup sour cream (or plain Greek yogurt)
2 large eggs
3 Tbsp. unsalted butter, melted and cooled slightly

1. In a medium bowl, mix together all the dry ingredients. In a second bowl, whisk together the buttermilk, sour cream, eggs and butter. Make a well in the bowl with the dry ingredients and pour in the liquid mixture. Carefully fold wet and dry ingredients together being careful not to overmix the batter. It will be lumpy. Let the batter sit for 10 minutes.

2. Meanwhile, preheat a griddle or skillet over medium heat. Spray the griddle with non-stick cooking spray. Drop batter by 1/4 cupful’s and watch for bubbles and for the edges to set. Flip then cook for another minute or two, until golden brown. Enjoy!
Buttermilk Pancakes 4

Double Chocolate Chip Cookie Dough Ice Cream

26 Apr

Double Cookie Dough Ice Cream 2
So, I don’t want to jinx things but it seems like maybe, just maybe, spring weather is finally arriving around here (despite the fact that it snowed a bit earlier this week). It’s been in the sixties the past few days and forecasted for the 70s next week. Can’t complain about that! Hopefully, it just stays this way and the heat doesn’t come and slap us across the face right away.
Double Cookie Dough Ice Cream 1
But in case it does, I have this ice cream in my arsenal to help cool us off. And now you all do too!

Joel’s favorite ice cream is cookie dough and I have made it for him several times (please forgive me for the pictures, it was in my early days). But when I saw this, I knew it was all over. Why just make plain old vanilla ice cream and add cookie dough when you could make cookie dough flavored ice cream with cookie dough chunks mixed in. And so much cookie dough that it is literally bursting full and difficult to mix in. Now that’s what Joel’s dreams are made of…brown sugar, browned butter, chocolate chip-y goodness.
Double Cookie Dough Ice Cream 3
Double Chocolate Chip Cookie Dough Ice Cream
recipe from Annie’s Eats

For the cookie dough:
5 Tbsp. unsalted butter, melted
1/4 tsp. salt
1/3 cup brown sugar, packed
1/4 cup flour
1/2 tsp. vanilla extract
3/4 cup mini chocolate chips

For the ice cream:
3 Tbsp. unsalted butter
2 cups heavy cream
2/3 cup brown sugar, packed
4 large egg yolks
Pinch of coarse salt
2 tsp. vanilla extract
1 1/2 cups whole milk
1 cup mini chocolate chips

1. For the cookie dough: stir together the butter, salt and brown sugar in a small bowl. Once combined, mix in the flour, vanilla and chocolate chips. Spread the dough out onto a piece of saran wrap and tightly cover. Refrigerate for at least an hour.

2. For the ice cream, melt the butter over medium high heat. Stir constantly and continue cooking until the butter begins to brown and smell nutty. Whisk in the heavy cream and bring to a simmer. While waiting for the cream to simmer, whisk together the egg yolks and brown sugar until thickened and pale. Slowly stream in a bit of the warm cream into the yolk mixture, whisking constantly. Once combined, stir in the rest of the cream then pour it back into the pan. Stir in the salt then cook until thickened and the mixture reaches 170-175 degrees F. Remove the mixture from the heat and pour through a fine mesh sieve into a large, clean mixing bowl. Stir in the vanilla and milk. Cover, place in the refrigerator and chill for at least a few hours.

3. Once chilled, freeze your ice cream according to your manufacturers instructions. Meanwhile, cut the cookie dough into small, bite-size chunks. During the last five minutes of freezing, slowly add in the cookie dough and chocolate chips so that they can mix in thoroughly. If your ice cream maker doesn’t allow this, wait until the freezing is done then quickly mix in the dough and chocolate chips. Freeze until firm or enjoy immediately.
Double Cookie Dough Ice Cream 4

Follow

Get every new post delivered to your Inbox.

Join 1,108 other followers